Getting started
This guides assumed you have already followed the installation guide.
If you prefer a video tutorial, you can start by watching our demo.
First, make sure you have Redis and RabbitMQ running. On a Debian-based system, one can run them with:
$ service redis-server start
$ service rabbitmq-server start
We can now launch Junebug:
$ jb -p 8000
This starts the Junebug HTTP API running on port 8000. At the moment it won’t have any transports running, so let’s create one using the API:
$ curl -X POST \
       -d '{
        "type": "telnet",
        "label": "My First Channel",
        "mo_url": "http://requestb.in/pzvivfpz",
        "config": {"twisted_endpoint": "tcp:9001"}
        }' \
       http://localhost:8000/channels/
Here, we tell Junebug to send all mobile-originating messages received by this channel to mo_url. We use a requestb.in url so that we can inspect the messages.
This creates a simple telnet transport that listens on port 9001. You should get a response like:
{
  "status": 200,
  "code": "OK",
  "description": "channel created",
  "result": {
    "status": {
      "status": null,
      "inbound_message_rate": 0,
      "outbound_message_rate": 0,
      "submitted_event_rate": 0,
      "rejected_event_rate": 0,
      "delivery_succeeded_rate": 0,
      "delivery_pending_rate": 0,
      "delivery_failed_rate": 0,
      "components": {},
    },
    "mo_url": "http://requestb.in/pzvivfpz",
    "label": "My First Channel",
    "type": "telnet",
    "config": {"twisted_endpoint": "tcp:9001"},
    "id": "bc5f2e63-7f53-4996-816d-4f89f45a5842"
  }
}
With the telnet transport running, we can now connect to the telnet transport:
$ telnet localhost 9001
If we take a look at the requestbin we gave as the mo_url when creating the channel, we should see something like this:
{
  "channel_data": {"session_event": "new"},
  "from": "127.0.0.1:53378",
  "channel_id": "bc5f2e63-7f53-4996-816d-4f89f45a5842",
  "timestamp": "2015-10-06 14:16:34.578820",
  "content": null,
  "to": "0.0.0.0:9001",
  "reply_to": null,
  "group": null,
  "message_id": "35f3336d4a1a46c7b40cd172a41c510d"
}
This message was sent to the channel when we connected to the telnet transport, and is equivalent to starting a session for a session-based transport type like USSD.
Now, lets send a message to the telnet transport via junebug:
$ curl -X POST \
    -d '{
      "to": "127.0.0.1:53378",
      "content": "hello"
    }' \
    localhost:8000/channels/bc5f2e63-7f53-4996-816d-4f89f45a5842/messages/
Here, we sent a message to the address 127.0.0.1:53378. We should see a hello message appear in our telnet client.
We should also get the message details returned as the response to our request
{
  "status": 200,
  "code": "OK",
  "description": "message sent",
  "result": {
    "channel_data": {},
    "from": null,
    "channel_id": "bc5f2e63-7f53-4996-816d-4f89f45a5842",
    "timestamp": "2017-11-16 07:22:25.162779",
    "content": "hello",
    "to": "127.0.0.1:53378",
    "reply_to": null,
    "group": null,
    "message_id": "5ee304925efd4afcaa6211a9a578a9f1"
  }
}
We can use this message ID to get the details of our sent message:
$ curl localhost:8000/channels/bc5f2e63-7f53-4996-816d-4f89f45a5842/messages/5ee304925efd4afcaa6211a9a578a9f1
Which should give us a response similar to
{
  "status": 200,
  "code": "OK",
  "description": "message status",
  "result": {
    "events": [
      {
        "channel_id": "bc5f2e63-7f53-4996-816d-4f89f45a5842",
        "event_type": "submitted",
        "timestamp": "2017-11-16 07:22:25.169550",
        "event_details": {},
        "message_id": "5ee304925efd4afcaa6211a9a578a9f1"
      }
    ],
    "last_event_timestamp": "2017-11-16 07:22:25.169550",
    "id": "5ee304925efd4afcaa6211a9a578a9f1",
    "last_event_type": "submitted"
  }
}
Which tells us that our message was successfully submitted.
Now, lets try receive a message via junebug by entering a message in our telnet client (followed by a new line):
> Hi there
If we take a look at our requestbin url, we should see a new request:
{
  "channel_data": {"session_event": "resume"},
  "from": "127.0.0.1:53378",
  "channel_id": "bc5f2e63-7f53-4996-816d-4f89f45a5842",
  "timestamp": "2015-10-06 14:30:51.876897",
  "content": "Hi there",
  "to": "0.0.0.0:9001",
  "reply_to": null,
  "message_id": "22c9cd74c5ff42d9b8e1a538e2a17175"
}
Now, lets send a reply to this message by referencing its message_id:
$ curl -X POST \
    -d '{
      "reply_to": "22c9cd74c5ff42d9b8e1a538e2a17175",
      "content": "hello again"
    }' \
    localhost:8000/channels/bc5f2e63-7f53-4996-816d-4f89f45a5842/messages/
We should see hello again appear in our telnet client.
Those are the basics for sending and receiving messages via junebug. Take a look at junebug’s HTTP API documentation to see how else one can interact with junebug, and junebug’s CLI and config references for more on how junebug can be configured.
Infrastructure Diagram
This diagram is an example configuration of how all the parts of Junebug fit together in a typical setup.
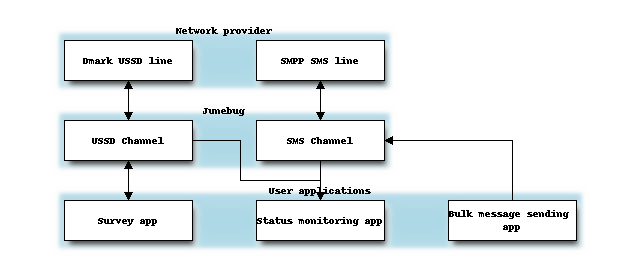
This diagram details a simple application that uses Junebug. It has two lines. The first line is a USSD line which the users will use to answer survey questions. The second is an SMS line, which is used for bulk message sending to prompt the users to dial the USSD line when a new survey is available.
Each of these lines is connected to a Junebug channel.
The USSD channel sends all of its incoming messages to an application which knows what to do with the messages, and can generate appropriate responses. In this case, the application will store the user’s answer, and send the user the next question in the survey.
The SMS channel receives messages that it must send out on its messages endpoint. These messages are generated by the bulk send application, which notifies the users when a new survey is available.
Both of the channels send their status events to a status monitoring app, which sends out emails to the correct people when there is something wrong with either of the channels.